Showing posts with label tute. Show all posts

5.5.11

Sew; Cushion Tutes Roundup #2

I have been veeeeeeeeery slack in posting the rest of the tute round ups – apologies! If you are still thinking about what to do for the swap, here are some more ideas:

corduroypillow

The trusty shirt back cushion – hardly needs a tute, but here is one anywho.

Try a swish zippered version with this great tute,

2957268338_77b794725d

..or transform a humble tea towel into a lovely piece of home decor here

the craft revival tea towel to cushion tutorial 14

Create a beautiful bloom to top your cushion cover with this cute tute -

DSC02034

…or use up your fabric scraps with something like this:

IMG_1157_thumb[2]

February was ‘Pillow Month’ over at Sew, Mama, Sew! So there is a bunch of cushiony inspiration over there too!

22.4.11

Crochet; Cushion Tutes Roundup #1

For those of you who like to wield the hook & would like to join in with the Cushion Swap, I’ve compiled a little list of links for inspiration & assistance.

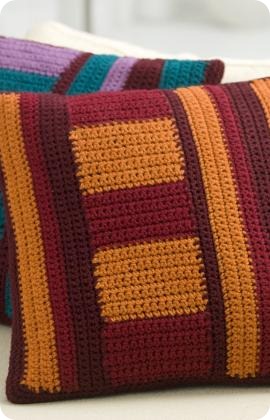
Free Pattern for Mod Striped Cushions;

LW2478

Free Pattern for Crochet Stripes Cushion Cover;

pj_crochetcushion_600x840

Free Pattern for Retro Crochet Cushion;

pillow-crochet-pattern

And, remembering we are only sending the covers, you might want to adapt your pattern to use only the front crochet panel & one of these methods;

Fleece cover for crochet cushion cover tute;

cushion 001

Repurposed jumper cushion back tute;

6a00e551101c5488340120a616e0b7970c-500wi

Happy hooking! Still time to sign up for cushion swapping fun here.

18.9.10

tIePod Cosy – Tute

tiepod

So, maybe you want to make an easy cosy for your iPod or iPhone (or maybe you don’t, who knows… you ARE fickle…) from one of the vintage ties you’ve been unconsciously stashing, knowing they’d come in hand for something, someday?

Just so happens I took some pictures as I was making mine, because, well, that’s what we do, isn’t it?

First of all, let me just say I hope you’ll use this more as a general guide than a hard & fast ‘How To’ – I just sort of made it up as I went along & can see now there may have been better/neater/easier ways to do it, so read through & come to your own conclusions, you’re a clever bunch, and most much more cluey about sewing than I!

1

2

(Note for above: Some ties will be tacked on the inside, you may need to unpick a little & re-sew the front seam… or, if you’re lazy like me… choose another tie…)

3

4

5

6

7

8

9

10

11

done

2.1.10

A little from column a, a little from column b…

I thought I might combine two topics into one post today, the lovely Lola Nova you see, put me in mind of people who can “pull off” yellow hair, and Kate & Claire would like to learn how to do photo mosaics… so…

I present a photo mosaic of yellow haired beauties!

yellowettes

I used picnik, because I luffs picnik, and although I have a premium account, you can make a mosaic like the one below without paying a cent. You can also use the mosaic maker over here for free.

Go to picnik, click ‘collage’.

Under the ‘Basic’ tab, click on the last option, the four large squares together like a window, you can select how many columns & how many rows you would like at the bottom of the menu on the left, obviously here I’ve gone with 3 columns & 2 rows. You can mess about with the spacing too there, background colour, proportions or “Kookiness” which means throwing the pics out of line & rotating them randomly.

scrnshot1 copy

I had already uploaded the pictures I wanted to use, if you haven’t yet just click “Upload Photos” down the bottom there & choose your pictures from your computer. Hold down the crtl key to select multiple pictures at once.

Drag & drop your pictures from the bottom row into your collage. Depending on the proportions of your pictures & the proportions of the boxes in your collage, a vital piece of the picture may be cut off in this step – to move your picture all you have to do is right click on it & hold the button down & move it until it’s in the right position.

scrnshot2

scrnshot3

In my Punky collage I edited each pic separately & added the text for the months & just uploaded them like this, for this one though, I added the text to the finished collage.

When you’ve got your collage looking how you want it, click done on the right at the top. You’ll be in the ‘Create’ tab, click ‘Text’, then click in the text box to write. After you’ve added the text you can keep it selected & use the Text Properties box to change the colour, size or font.

scrntext

To rotate the text, click on the circle at the centre top of the white box surrounding it. When you’ve added all your text, click the Save & Share tab up the top and… Save & Share!

saveandshare

Nothing too earth shattering there I know, but it’s fun!

20.12.09

DIY Cake Stand

DSCF0811
Truth is, I finished this cake stand a while ago but have been putting off sharing it – I thought I would make some sweet, pretty cupcakes to adorn it & show it’s cute functionality… but…. who am I kidding…?!

How to make;
DSCF0705
Collect yourself some bland plates: A dinner plate, a bread & butter plate & a saucer. Originally I was going to use some cute vintage plates & leave it at that, but when it came down to it I couldn’t sacrifice their lovely brown floral goodness to being glued forever more to some sherry glasses, so I decided to go with some ugly plates & paint the whole construction.
You’ll also need two of the afore mentioned sherry glasses, your local oppy shall, I guarantee, have a plethora, some heavy duty glue – make sure it says on the pack that it’s suitable for glass & ceramics – and some enamel paint. You’ll need the grey base coat & the colour of your finished piece… red, surely…?
DSCF0709
You know the glue is the real deal when it is kept separated….! DSCF0718
Find the centre of both your dinner plate & the bread & butter plate. Mix the glue (use a match stick) & apply it to the rim of one of your sherry glasses (if you have a larger & a smaller one, like I did, use the larger for the dinner plate) & attach carefully to the centre of your dinner plate. You don’t want to be too far off centre or your cake stand will look lopsided and perhaps be unstable. Repeat with the bread & butter plate.
When the glue is set, you can stack everything together & see how it fits. I found this part super easy – the bases of the sherry glasses fit straight & centred into the rimmed bases of the plates above. When you can see how they fit together, apply your glue to the base of the glass on the dinner plate & place the bread & butter plate on top. Repeat with your last plate & leave to dry.
DSCF0720
Paint stand with enamel base coat. You will need 2 coats – read the instructions on your paint tin – I had to leave 16 hours between coats with mine. DSCF0763
Now for the fun, yet time consuming part – painting the colour! Again you’ll need 2 coats, with perhaps 16 hours between each. I painted the underside of the plates first, let dry, then turned over & painted the other side.
DSCF0816
And voila! A super cake stand you can admire, whether it is filled with cakes or not.
DSCF0817

2.11.09

Buttons by Candlelight, aka "How to make a button bracelet"

You may recall my whinging recently about the price of buttons going up to the dizzying heights of $5 a jar at one of my local opshops...? Well when I was last in I was glad to see that the button jar pricer had come to their senses (...perhaps their sales were down due to my refusal to by buttons...? I buy enough of them so that certainly is possible...) & repriced the jars at $2. That's a dollar cheaper than they used to be before the crazy jump! So I bought 3 jars of buttony, buttony goodness, and spent an embarrassingly long period of time sorting them into colour families.


Things I learnt about opshop jars of buttons;

There are more white or clear than any other colour.
The least popular colour is yellow.
There are some hideously ugly buttons in there.


After sorting them I realised that I finally had enough red buttons of the appropriate size to make myself a button bracelet - Hurrah!

Button Bracelet Supplies;
1 candle
1 (or several... just to be safe) quite large, strong needle
A charm bracelet blank
Jump rings
Pliers
As many (plastic) buttons as you want on your bracelet


Ah! Crafting by candlelight....

Light your candle
& hold the tip of your needle in the flame, I try to heat as much of the needle as I can as it makes going through the entire button a wee bit easier, but it depends on the size of your needle, you don't want to burn your fingers!

You might want to use gloves or use your pliers to hold the needle, but I found it fine to hold on it's own - just make sure you hold it as far back as possible.


Decide where you want the hole for your jump ring to go & pierce it with your needle - you have to be really fast with this step or your needle will be too cool & you'll either have to heat it up again or you'll bend the tip of your needle. Not that I know, because I wouldn't have done it any way other than perfectly... *whistles inconspicuously*


What worked for me; Holding the button up & piercing it from the side & then twisting the button down the length of the needle. Sometimes the button gets stuck at the bottom of the needle, just push the point onto a flat surface & press the button down & it will slide off.


Pierce many buttons. Attach with jump rings to bracelet using your trusty pliers. You can arrange your buttons in the order you want them before you attach them, but I just did it haphazardly, as I do.


Take artsy fartsy photos of your lovely new bracelet & admire your handy work. Perhaps even wear it. Wonder if making button bracelets counts as wardrobe refashioning.

2.10.09

Orange Jack-O-Lanterns! Halloween How To.

Not only is October Blogtoberfest month, it's Halloween month too! Halloween isn't really a big thing in Australia though I so wish it were... there are lots of things I wish for; to grow a real money tree, to meet a fairy, the power of invisibility.... none of those are going to come true any time soon.
No Matter!
The Punky household can still indulge in some spooky fun, no matter what the neighbours may think!
Depending on what sort of time I find on my hands, I intend to craft up some more Halloween goodness in the next few weeks, but I made Orange Jack-O-Lanterns today; they are super quick, super easy & super cute.

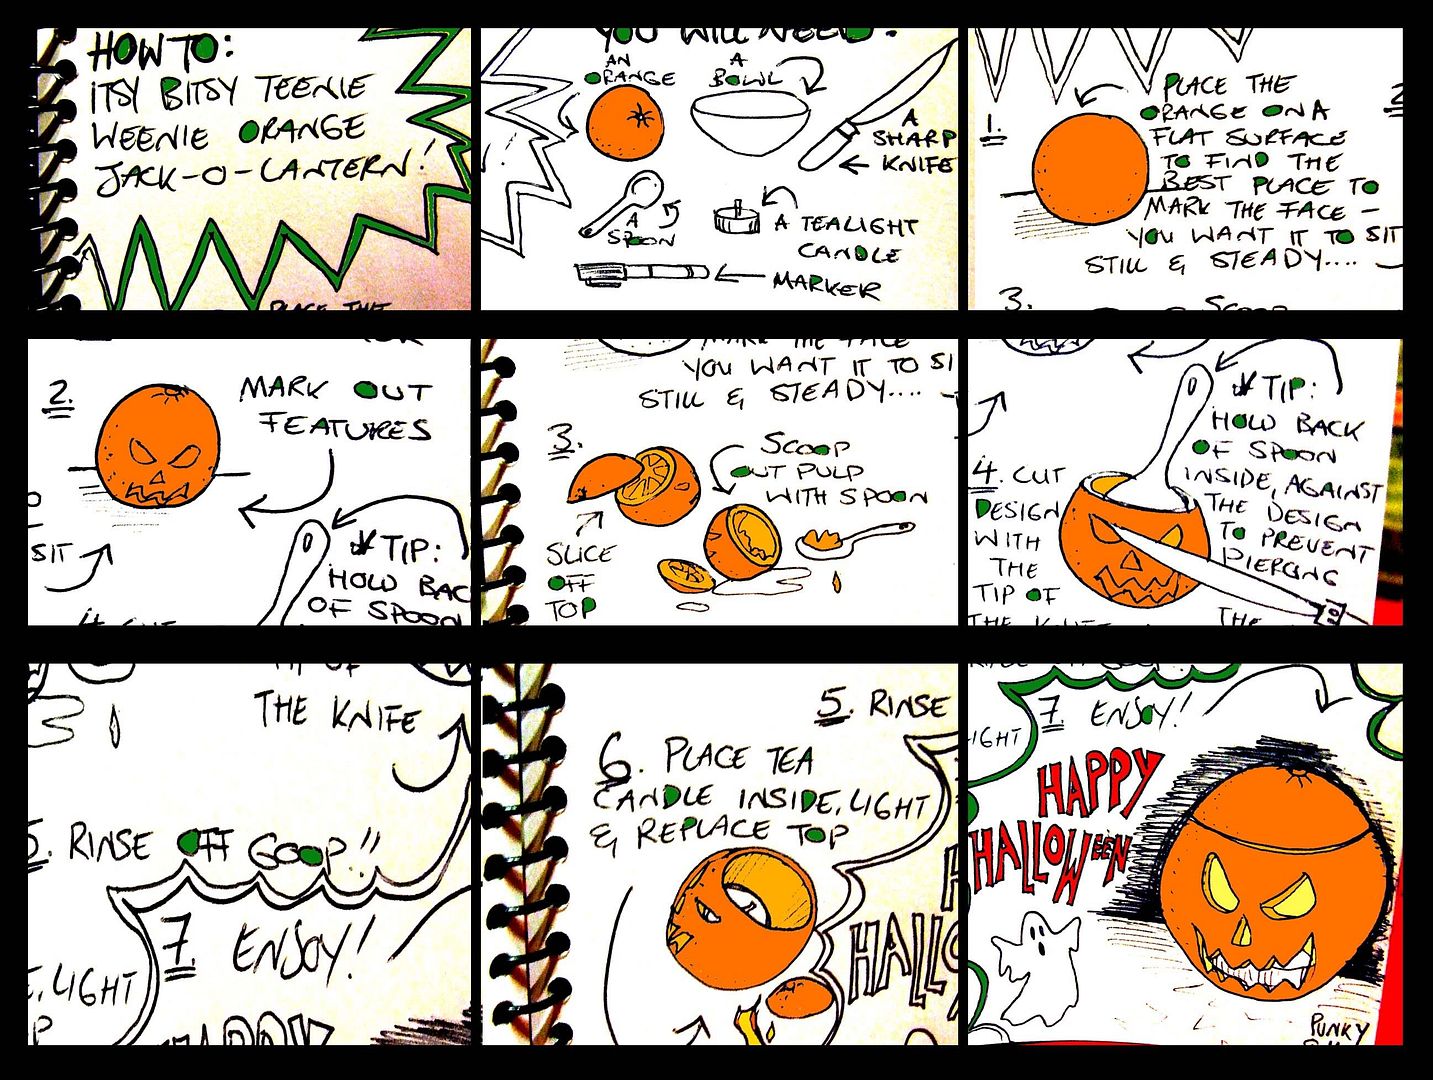
How To In Comic Strip Form:

So, that is (in case that graphic is too weird for you...);

  1. Gather up your supplies- Oranges, a bowl, a sharp knife, a tea light candle, a marker & a spoon.
  2. Set your orange down so you know the best angle for it to sit still & steady.
  3. Mark the face.
  4. Slice off top of orange (keep the top!) & scoop out all the pulp into the bowl.
  5. Carve out features with your knife, if you put the spoon back against the side you are carving you won't go through to the other side accidentally.
  6. WASH OFF THE GOOP! There will be much goop (why I drew the process instead of photographing it!) and you will be sticky.
  7. Place a tea light candle inside your wee jack & light it, place lid on carefully.
  8. Voila!

Of course I don't have to tell you not to leave these babies unattended but I will anywho... Don't leave them unattended!! If you have long burning tea candles I would recommend leaving the orange top off, I promise it'll still look cool!


26.2.09

Tutu cute!


So much can change between posts I'm afraid... I should, right now, be enjoying a spin on my new ALDI overlocker, but, alas, it was not to be.

Not only do I not have the spare $199 to buy it but negative reviews of the machine in question had me rethinking... even if I could afford it.

I went to my local sewing machine shop instead & enquired about layby, the lovely lady told me to hold off for the Mothers Day catalogue if I could so that is what I am going to do. I'm going to put $20 aside every week as if I had an overlocker on layby already & put that down as a deposit if there is some great machine on super duper special.

Other than that, I have made Punky a tutu... just because. You will note that poor Miss P has a black eye, the result of a nasty incident with a metal door mat... :(


I made the tutu with strips of netting knotted over some elastic, I like the look but not the fit (it's all stiff because of the knots & feels uncomfortable as they sit right on the waist.) so I am going to see what I can wrangle with a bit of tweaking & perhaps some sewing.... stay tuned! If I can work something out I just might share my very first tute.

Yesterday I attended a training day for a sustainability workshop I've volunteered for, it was interesting & fun & I really enjoyed it. We had a delicious lunch & got eco-freebies... woot!

We also tried a new playgroup this week, I don't know why I didn't like the last one we went to, but I didn't. This one was very different, it's a multicultural group with mostly refugee families, everyone was incredibly nice & Punky had a great time running around with the older kids.

LinkWithin

Blog Widget by LinkWithin